When we were looking for a new home I wanted a fireplace so desperately. I longed for winter nights reading by a cozy fire while watching it snow outside. I was so excited that the house we bought had a fire place in the living room, however the dated golden oak and ceramic tile surround dampened my excitement just a tad. With a limited budget but huge desire to love my new (to me) fireplace I was able to update it to something that I love while keeping it budget friendly! If this sounds like something you can relate to, this post is just for you.

This post contains affiliate links, which means I will make a small commission at no extra cost to you. See my full disclosure here.
Where We Started
I wanted to share a before picture of my living room. I apologize for the photo quality. It was taken during one of our walk throughs of our home (phone photos have come a long way over the past 5 years!). But its important to know "where we started" so you can appreciate the "where we are now" later on in this post. 🙂
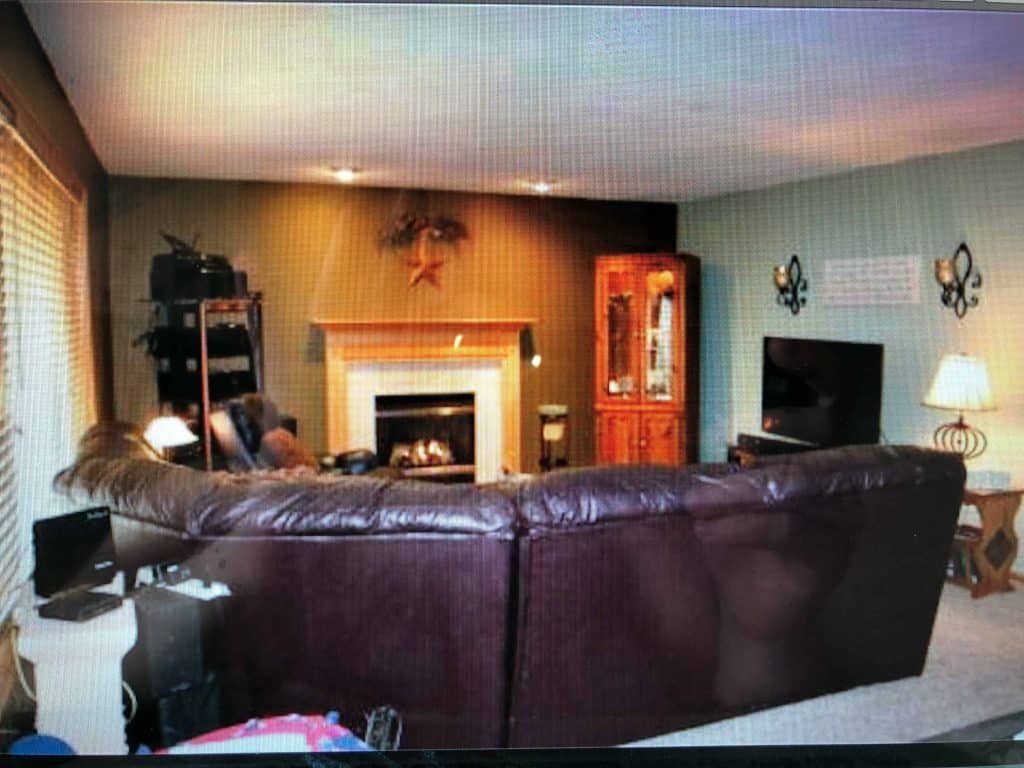
Here is a photo of the fireplace once we moved in (and painted the walls because that green made me feel like I was in a dungeon).

I stared at this builder grade fireplace for about 4 years before I became brave enough update it. I knew that a new fireplace was not in the budget and honestly the surround was in good condition. We did not have a lot of money to throw at this project so needed an easy, inexpensive way to update this outdated fireplace and make it feel like home. After months of research I finally decided to take the jump and paint the tiles and fireplace surround to give it a fresh new look.
Updating the Surround
Our ENTIRE house was golden oak when we moved in. The floors, trim, cabinets, it felt like I was drowning in it! The first thing I decided to do was paint the fireplace surround to match the trim we had already painted white. It's amazing what fresh paint can do! Here were our steps:
- We first lightly sanded down the surround. This doesn't need to be an intense sand, but enough to roughen the surface to allow it to accept the primer and paint.
- We then applied two coats of Bin Advanced Primer. This stuff is a little smelly so make sure you are painting on a day you can open the windows. It did such a great job at hiding the yellow and a year later (in a room that gets a lot of sunlight) we haven't had any fading or yellowing at all!
- The surround was finished off with two coats of pure white paint. Don't forget to wait the recommended dry time before doing another coat, it may take a long time, but it is worth it to make sure the paint adheres correctly. For the small grooves we used a small paint brush, courtesy of my child's art stash, which worked perfectly.
Goodbye Gold!
Now, don't get me wrong, I love a good gold detail in a home. I just couldn't come to love it on the fireplace. The gas fireplace insert was in good shape so didn't need to be replaced, however the gold bars at the top and bottom just did not seem to fit my style.
After painting the surround I decided to spray paint the top and bottom gold bars to flat black. I picked Krylon High Heat flat black spray paint. When picking a spray paint make sure to find one that is designed to withstand high heat. I love the look of the flat paint against the rest of the fireplace. It was so incredibly easy to use and has held up really well over the last 6 months. If you do anything, do this! It's an inexpensive and simple update that will give your fireplace a more modern look.

Painting the Tile
Okay...drum roll please...this is where the fireplace really comes to life. The transformation from the above picture to the one below still has me giddy. I did months of research, literally, months, before committing to painting the ceramic tile surround. Does anyone else get paralyzed by researching and not just jumping into a project? It's. The. Worst. I finally decided that I just had to paint these darn tiles. I was taking so many evenings reading about all the different ways other people were doing it, it was actually becoming annoying. So if thats you, this is your nudge to pick up that paintbrush and tackle your project head on.
- Clean your surface first. This helps get rid of any dust or dirt that has built up. I did a deep cleaning with teaspoon before doing anything else.
- We did not sand the tiles for this project, but if you wanted to sand this is when you would do it. The only reason I decided not to is because I strongly dislike how much dust sanding produces!
- Caulk the edges between the ceramic tiles and the mantle surround. One lesson you can learn from us- do not use waterproof caulk (it not only repels water but also paint) - You can thank me later 🙂
- Paint! We used a brush along the edges and a small roller like this to do the tiles. When using a brush make sure it is one for edging, it will make your life so much easier. I am partial to Purdy brushes. I've had too many projects complicated by bristles coming off while painting and haven't had this issue with Purdy. We used this brush for this project. We did 3 coats of Peppercorn by Sherwin Williams.
Final Thoughts
I can't believe I waited 4 years to do this! We have had the paint on the fireplace tile for about one year now, it has held up exceptionally well. There has been one chip that was due to someone getting excited with the vacuum and knicking the tile. We were able to easily fix the spot by painting over it with a small brush.
This entire project was so fun! I can't tell you how much I now love sitting in our living room with the fireplace on and a good book in hand. It has become a focal point in our house and visitors comment on it constantly. This budget friendly fireplace update has been one of the most impactful changes we have made in our house thus far. If you are contemplating doing this project in your home I hope this has given you the gumption to just do it!


What color did you use to paint the tiles?
Hi Kara- We used Peppercorn by Sherwin Williams! 🙂
What brand is the paint you used is it heat proof . I'm dying to paint my fireplace but too scared loved reading your story getting inspired to go ahead and do it .
Hi Mags- I used HGTV Home by Sherwin Williams (they sell this at Lowes) in Showcase. Our tile does not get hot when our fireplace is on so we did not use heat proof paint- but this may be different for different styles of fireplaces. We did use heat proof paint for the metal bars that go directly onto the fireplace front. I hope this helps, I know the feeling of dragging your feet and am so glad I just did it! 🙂
Love this! We have an identical fireplace an I am going to try this. Did you also paint the large floor tile in front of the fireplace?
Thanks so much!
I did! I painted both the surround and the tile on the floor. We have 3 young active kids and it has stood up so well over the last 2 years. I would do it again 100% and wish I did it sooner! We would love for you to share your after photos with us 🙂
Love the end product! What did you use for above the fireplace? We’re doing a similar shiplap design but can’t decide on trim surrounding the ahiplap/
Thank you! We had quarter inch PDF board cut at our local Home Depot into strips to create the shiplap look and then bordered in the shiplap with 1x4s and painted it all white. It worked perfectly and has held up for the past 3 years!