A fun and whimsical decoration, this easy felt ball garland tutorial is so simple to make and there is no felting required!

This post contains affiliate links, which means I will make a small commission at no extra cost to you. See my full disclosure here.
I love garlands. They are the most versatile decoration of all time and you can hang them on literally anything and it will make it look cute. We just made this felt heart garland , which was a great beginner felting project and such a cute decoration for Valentine's Day!
Felt ball garlands are an easy craft to make, take just a little bit of time and you can customize them for whatever holiday or occasion you would like! Change up the color scheme of your felt balls and you can have a pretty garland for your Christmas tree or mantel as well as a fun garland for a nursery or birthday party decor.
This simple felt ball garland is an easy home decor project and a fun way to add a handmade touch to your home! It would also make a cute gift for a housewarming party, baby shower, or birthday!

How to make a Felt Ball Garland
Materials Needed
- Felt balls - This is what I used because I liked all the different colors, but you can find felt balls on Etsy or your local craft store!
- Tapestry Needle or embroidery needle
- Metallic String, embroidery thread, or cotton thread
- Scissors

Tips Before Beginning
In order to make this process as easy as possible, buy the felt balls. You could make them using this wet felting process with wool roving if you wanted a lot of practice making felt balls, but it will take quite a bit longer to make your own felt balls.
The thread you buy needs to be strong and not elastic. If you decide to use embroidery floss, do not separate the threads.
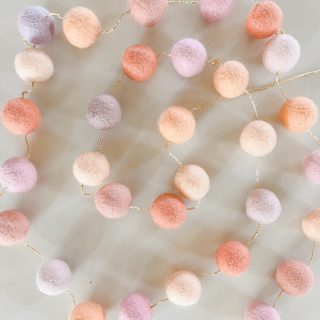
There are different sized wool balls, the ones I used were 2 cm or .8 inches. I decided to leave a space in between my balls, and I used 35 balls, and ended with a 5ft garland. If you decide to not leave a gap you will need more felt balls. You will also need more if you decide to use smaller size of felt balls.
It can be hard to push the needle through the felt ball at times. If you place the ball on a solid surface and then push the needle straight down it can help. If you find your balls are too hard to push through, try a smaller needle size.

Felt Ball Garland Instructions
- You will first need to determine the length you would like your garland. Cut your string about 1 foot longer than your desired length in order to leave some extra length on the ends of the string for hanging it up.
- Line up the balls in your desired color pattern, or just decide as you go, which is what I did 🙂
- Thread the string through your needle and take the needle and thread it through the center of the first ball. Slide the ball down to the bottom of the string. Tie a small knot at the end of the string to keep your ball from moving around.
- Continue creating your pattern until your garland is the desired length. Finish with another knot at the end to keep your balls from sliding off the string.
- Ta da! You're done with your own diy garland! Now to decide where to put it...

Ideas for Styling your Felt Ball Garland
Like I mentioned above, you can drape this garland on anything and it adds instant charm 🙂
Some of my favorite ways or places to hang garlands are:
- On the mantel
- Mixed with fairy lights
- Intertwined with a wooden bead garland
- Draped on a chandelier
- On the Christmas tree
- In a nursery over a crib or as wall decor
- Mixed with a floral garland
- Laid on the table as part of a tablescape
- Over shelving or a large hutch
- Hanging on a large mirror

Variations to add in your garland
There are lots of ways to customize your garland for different occasions! Here are some fun add ons and variations you can include in your garland:
- Wooden Beads
- Pom poms
- Tassels
- Felt shapes like red and white stars for fourth of july, pink hearts for Valentine's day, pumpkins for Halloween, candy canes for Christmas, etc.
- Different sized felt balls
There are so many ways to be creative with your garland! Don't be afraid to try new color schemes and if you don't like it, you can just take the balls off and start again and reuse them over and over!
I hope you enjoy this easy diy craft project and please share below how you are going to decorate with your beautiful garland 🙂
Happy crafting friends!
DIY Felt Ball Garland
Equipment
- Tapestry needle or embroidery needle
Supplies Needed
- Felt balls
- Cotton thread or embroidery thread
Instructions
- Cut your string about 1 foot longer than your desired end length in order to leave some extra room on the ends of the string for hanging it up.
- Line up the balls in your desired color pattern
- Thread the string through your needle and take the needle and thread it through the center of the first ball.
- Slide the ball down to the bottom of the string. Tie a small knot at the end of the string to keep your ball from moving around.
- Continue creating your pattern until your garland is the desired length. Finish with another knot at the end to keep your balls from sliding off the string.
- Hang up and enjoy!


Comments
No Comments